Monday, December 30, 2013

Things With Wings!

It's time for the twins' birthdays again! And despite the fact that I didn't think I was going to be able to pull it off, I did. Because I rule. The twins are really into imaginative play, as any 5 year old is, and since mom is really into handmade stuff I pushed myself to complete a project for each of them. I can honestly say that it took longer for me to work up the motivation for these projects than to actually complete them. Especially since I completed both in a matter of a few hours (ONE DAY!) and put the project off for about two months...

Thing One is really into dragons and knights, so for him a handmade dragon capelet that he can easily get on and off (modeled by Diva-- note the fierceness). The capelet is made of felt, green glitter and matte orange, elastic and some velcro.

Thing Two is prefers things a little more feminine so for her, a monarch-inspired butterfly (also modeled by Diva).This is also made of felt, black glitter, purple and white, as well as some elastic.

I can't wait to see if they like them!

Saturday, December 21, 2013

Santa Claus Came to Town!

It's amazing how life can just get away from you. In August I took on a temporary job and was working full time, plus being a full time mommy and wife to two spunky little girls and hubby. Needless to say there wasn't much time for sewing. But there was one project I was determined to finish by Thanksgiving. Thankfully I started it in July, otherwise I never would have made it.


I bought the pattern for this beauty way back in February and knew I was going to make it for my parents' house as an early Christmas gift. I was slightly disappointed by the pattern itself. It came together well enough, but there was absolutely no wiggle room. What I mean is that instead of the pieces overlapping, they were designed to basically butt up against one another. Since I didn't realize this and it was hard to judge exactly where the pieces belonged, when the whole thing was put together there were gaping holes in the beard. I was able to remedy that by putting a big section of white under it before I appliqued it to the black background but if I ever did it again I thing I would redraw the pattern pieces to allow for some overlap. 

I also didn't follow the pattern for the boarder. It was more applique to create a candy cane stripe and holly leaves. I was just too appliqued out. But I actually LOVE my fabric choices, maybe even a little bit better than the original design. 

After the whole top was assembled, I hadd- embroidered the face, and a couple of other parts like the thumb line and the lines that add dimension to the gifts. Then I free-motion quilted it to the batting. I did the outlining edges of everything but the beard. For that I tried my hand at thread-painting. 


Then I sewed it right-sides together to the backing with the rope-style binding and turned it out like a pillowcase  and hand-sewed the last side. Done! I also added a rod pocket to the backing before I did all that.

I really, really love it. I told my mom if she didn't absolutely love it I was taking it back with me!! She did, so I guess she can have it. I hope everyone has a happy rest of the holiday season!

Saturday, August 10, 2013

I'm back!

Whoa. It's been a long time. I had a really busy spring and I guess I needed a couple of months to recover! Don't get me wrong though... I've still been busy. I just haven't had time to share!

After Little Loo's 1st birthday and school wrapped up, I took a couple of weeks to recover before starting my next big project-- Diva's new nap quilt for school. Unlike last year, when I whipped up her quilt (start to finish) in about a week, I wanted to spend some time and create something really special. When I asked Diva what type of quilt she wanted, naturally she told me "something princess-ey." I knew just what I was going to do!

At my first quilt show I had bought a pattern that I just adored called Happily Ever After by Ribbon Candy Quilt Company. The pattern was for a 42" square quilt which was just not the right size, but I was able to modify the pattern to work, and I love it even more.

In case you are wondering, I duplicated the blocks from the top row, adding them as a row to the bottom, and swapped the direction of the bottom (now middle) section. Then, I patterned the words "happily," "ever," and "after" and patterned the dragon from a coloring page I found online. I also omitted the flowers. This was the first time I tried applique, and I decided it wasn't as scary as I thought it was going to be.

The other thing I wanted to do on this quilt was try out a whole bunch of new and different quilting techniques. I'm so glad I did. I tried all sorts of things. Below are my two favorite blocks, front and back. I love how I was able to quilt in the cobblestones and scales, and I especially love how you see the images from the back of the fabric, a blue minky dot.


And while we are on the subject, I heard nightmarish stories about quilting with minky. But what can I say, I'm a glutton for punishment I guess, so I decided to go big or go home. Honestly though, I had absolutely no issues with it! I used a combination of my 505 basting spray and straight pins and nothing shifted so much as an inch.

Well, I hope you enjoyed this quilt. I had a wonderful time making it. And I know Diva loves it!


I hope to be back soon... I'm half way through a Christmas wall hanging, and I also have another quilt that needs to be done by mid-October. I'll keep you posted!

Linking up with Made with Love Monday!, Market yourself Monday, and Let's Get Acquainted Monday Link Up (buttons of the right bar).

Sunday, May 19, 2013

Come one, come all and join the fun!

Little Loo just turned one!


 I can't believe my youngest angel has just turned one. I know I've been totally MIA over the last few weeks. Between Diva's Beauty and the Beast birthday extravaganza, the school auction and quilt, and getting ready for Loo's big 0-1, I've been a bit swamped! But I'm super excited to get to show you everything I've been working on!


Here are photos of my projects in no particular order. I created the pennant below to compliment the decor. It was super easy to make. I cut out triangles. Sewed them wrong sides together and then sewed them into extra-wide, double-fold bias tape. The quilt (if you remember) is the quilt I made before Loo was born. It just so happened to match! I also made some matching, no-sew, birthday hats. They were super easy and looked amazing.

 The next project were these home-made (or at least home-painted) faux carousel horses. These horses were made from old Radio Flyer spring mounted horses (and other similar products). I took the horses off the springs, spray painted them white, and then hand-painted their details. Before they were painted, my husband cut holes into them and fit them with PVC pipe, which was later painted to match.


There's one of those birthday hats I mentioned above. I also made the display for behind the cake from a giant canvas and some of those great party decoration fans.


And now, the cakes. When I decided that Loo's theme would be "vintage carousel" I knew I wanted to do just that for her cake. Wilton makes a carousel topper that I hand painted and inserted into the cake. I also placed the cake on a turntable so the carousel actually rotated.


Well, that's pretty much it. I hope you enjoyed what I created... I know Little Loo did!


Wednesday, May 1, 2013

April Finish

Wow. This month was quite the whirlwind with everything going on! But I did manage to finish what I had set out to do. The taggie baby quilt for my friends baby shower (taking place this weekend) was finished yesterday, just in the nick of time!! Without further ado, here it is.

I used charm packs from Riley Blake's Willow collection and taggies in a bright yellow. For the first time ever, I tried the disappearing 9 patch. Considering the fact that I was sooo rushed on this, I think it came out really cute. I also used a satin blanket binding, which I had never done before either. It really gives it an extra baby quality, and the texture is a nice change too. 

I also tried a new quilting technique with this quilt, and was able to quilt hearts all over it. I love love love the way it came out. I only wish I had put even more on there.

Linking up with: (see sidebar for links)
TGIFF
Can I Get A Whoop Whoop
2013 NewFO Project
A Lovely Year of Finishes (apparently I'm a day late for this one! Oops!)


Saturday, April 27, 2013

It's going.... going....

Tonight is the night of the auction for Diva's school, so I thought I would finally show the quilt. I hope it was worth the wait!


The quilt blocks were designed by middle school students, colored by a high school senior, printed onto fabric and then hand embroidered by parents, staff, and friends. 


Custom fabric with the auction's artwork and logo was created for the backing. 


A close up of one of the blocks and quilting-- a swirling meander with random horse shoes.

I also made a small throw pillow. On one side was the custom fabric. On the other we embroidered "2013" and the names of all the middle school artists.

Tuesday, April 23, 2013

Come Be Our Guest

Diva's birthday party was this weekend, and in true Diva fashion we celebrated like kings and queens with a Beauty and the Beast themed party.


I wanted to do something really special for her 4th birthday, since it was the first one that she was having with friends from school. When she picked out Beauty and the Beast as her theme I was ecstatic! It's my favorite Disney movie and it gave me so many options to work with!

We decided instead of pizza we would have lunch be themed. Our menu consisted of "Selections from the Boulangerie" (croissants, mini muffins, mini bagels, etc.), "Formage," "Gaston's Wild Boar" (spiral ham), "Fritatta with Garden Vegetables," "Les Pigs in a Blanket," and beverages like "Lumiere's Lemonade," "Cogsworth's Cafe," "Chip's Favorite Sweet Tea," and of course "Mrs. Pott's Signature Tea Selections." 


I decided to invite Belle to the party, and wouldn't you know it, but her calendar was free! It was so wonderful for Diva to meet her. She did story time with the kids, pretended to be other characters (like Gaston and Mrs. Potts), and we even had princess training where the kids learned to walk with books on their heads! It was wonderful. Diva had a blast!

After all of that excitement we got ready for some cake. I made the cake again this year, and really liked how it turned out, despite it's simplicity. The cake was the story book, and then I added the enchanted mirror (with a picture of Diva inside) for effect. Both were fondant.


I hope you enjoyed this post, I know Diva enjoyed her party! One down, one more to go!


oh wait... I forgot to mention the birthday bomb that went off in our house when we got home.


Sunday, April 21, 2013

Hands2Help Quilt Progress


I decided to use the blocks that I was making for the Beginner's QAL for my Hands2Help charity quilt. I decided to only use 9 of the blocks since I don't want it to be a bulky lap quilt (and partly because I didn't finish the 12th block! shhhh). I'm not totally thrilled with the black fabric in the quilt, but this was my second quilt I started, and the first one where I selected my own fabric... I think part of the reason it isn't sitting well with me is because all of the blocks are different, and those two really just stand out too much. It's not quite as harsh in person, but still not my favorite.

Linking up with Hands2Help.

Wednesday, April 17, 2013

WIP- Baby Taggie Quilt 3

I mentioned earlier that my old college roommate (ok... she's not really that old!) is pregnant with her first bundle of joy and I decided to make her a quilt for the baby shower coming up in the beginning of May.

Despite everything going on, I managed to finish the quilt top. I'm not super proud of it, but it turned out way better than expected given the rush I am in and the fact that I didn't pin anything (please don't crucify me!!). Its also the first time I used charm packs, which has a learning curve all of it's own. For anyone wondering, I used Riley Blake's Willow Collection for a low volume, gender neutral top, and included about 7 yellow riccrac taggies. The back will be one of the yellow floral prints from the collection and the binding will be a satin blanket binding in pale teal.


I aslo decided to include 5 flannel burp clothes. I made these for myself when I was pregnant with Loo and they are my absolute favorite! I still use them and she is almost a year old... I use two different flannels, again gender neutral. The two below are sewn but still need to be ragged, and I have three more sets that are cut but need to be finished!


Wow that's a big to-do list for just 2 weeks from now. Not to mention Diva's birthday party is this weekend, and the school auction (that I made the Kentucky Derby quilt for) is next weekend. I've also been working on my Hands2Help quilt, but more on that on Sunday. My head is spinning just thinking about it all.


Linking up with WIP- Freshly Pieced and A Lovely Year of Finishes.

Sunday, April 7, 2013

Charm Pack Tutorials

Although I am not using charm packs for the Hands2Help Charity Quilt Challenge, I think it would be great for future charity quilts. Additionally I am needing to make a couple of baby quilts rather quickly, and since I've never made quilts using charm packs I wanted to find a couple of great tutorials/patterns to have in my back pocket. So I thought I would take this opportunity to share them with you as well. Here are my top 5, in no particular order.

Wendy of Snippets of a Quilter published a great tutorial for the Disappearing Nine Patch. What I like about her tutorial is that not only does she show you how to do the disappearing nine patch, but she shows you three different ways to arrange the blocks.

Carolina of Always Expect Moore did a great tutorial on how to make a pinwheele block with two charm squares. Her technique is interesting because instead of making two HST and then cutting then down again she sews all the way around the 4 sides of the charm squares (right sides together) and there is no waste! Check it out, I've never seen it done this way!

Amy Smart of Diary of a Quilter posted a beautiful picture of her Rainbow Connection quilt. Its a really different look, combining charms and HSTs. The pattern is available for purchase here.


Natalia and Kathleen of Piece N Quilt have a wonderful tutorial for baby blocks using charm squares. I love how cute these are, and that you can give them along with a baby quilt. I night have to add that to my plans!


Minnesota Charms has GREAT sheets for charm packs, layer cakes, and more to figure out final dimensions and fabric needed. I highly recommend you check it out!


Linking up with the Hands2Help Favorite Tutorial Linky Party

Tuesday, April 2, 2013

April's To Do List

March is over and I am so proud that I finished up the auction quilt on time and completed a few other special, if unplanned, projects too!
My top priority for April (and the one for A Lovely Year of Finishes) is a baby quilt for my friend and former roommate who is pregnant with her first. The baby shower is May 5, so obviously I have a hard and fast deadline for that. I picked up some charm packs and plan to use those to put it together. It will be the first time using charm packs, so wish me luck!

I have some extra custom fabric left over from the auction quilt so I want to make a pillow for the woman who designed the artwork, so I'll add that to the list too.

I also need to work on my Hands2Help quilt. I'd like to try to put together the quilt-top at the very least this month. That shouldn't be hard to do since the blocks are all completed... I think.

The next thing I want to accomplish is cleaning up the sewing/guest room. It's a nightmare. My initial plan was to get it all pristine at the start of last month, but with the auction quilt looming I figured it was pointless since I was just going to mess it up again... But it is time.

This may not seem like too bad of a list, but I am also working feverishly on Diva's birthday party too. I have lots of things planned and I can't wait to show you what is in store for that. I started work on some of the pieces for her cake today (finally!) and I have been collecting props and menu planning too. I'm about to burst open at the seams but I'll try to contain it!

Linking up with A Lovely Year of Finishes goal setting party.

Friday, March 29, 2013

Hands2Help

H2H 2013 logo
Now that the auction quilt is finished I can move on to some other projects. Although this wasn't on my list of things to accomplish this year, when I saw the challenge I decided it was something I needed to do. So I have committed to making 1 quilt for Quilt Hugs for Happy Chemo. I know too many people who have had cancer and would like to be able to give a hug to someone going through it. I plan to use the blocks I made for the Beginner's Quilt Along a while back. I never finished the top, and I feel like this would be a great reason to finish up a UFO. The deadline for this project is in June, so keep an eye out for progress posts! Here's the schedule:

April:
 7 - Linky party to a favorite on-line tutorial, tip or recipe for quilting snacks. 
21 - Link up to show off progress made on challenge quilt

May: 
19 - Link up to show off your progress on challenge quilt

June: 
 2-8: Link up and show off finished quilt!
14 - Deadline to mail quilt 

Thursday, March 28, 2013

It's done!


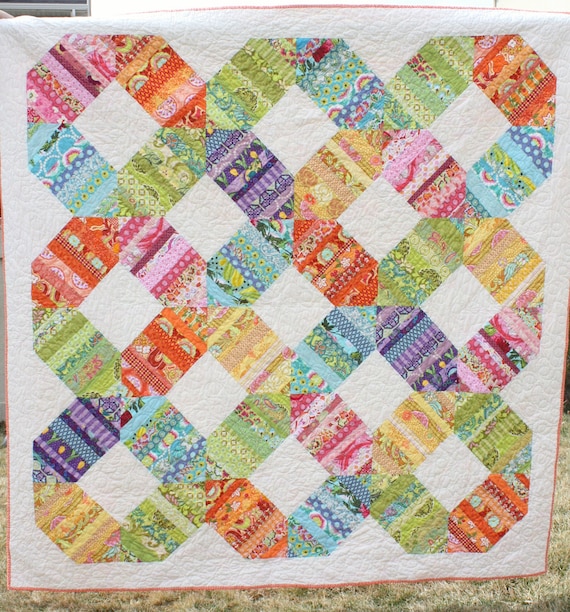
I did it! The school's auction quilt is FINALLY done! AND I managed to get it done by my personal deadline of the end of March. The auction is until the end of April, but since April is an especially crazy month, I was determined to get it done by Easter. I'm told the quilt has never been finished this early, so hooray for me!

Now, I'm sure you all want to see the finished quilt, but I'm sorry-- you are just going to have to wait!  I hope you can be patient. I'd like to get some really nice, quality photos of it, and then make one final post of it after the auction, along with how much it ends up going for.

In the mean time however, I thought I would take you through the journey of how this quilt came together. I've been getting a number of comments and question about what a great idea for a school fundraiser this is, so I thought I would lay out how I did it, and give some modifications for how it could be done for your fundraiser.

First, let me clarify something. The auctioning off of a quilt full of student artwork is a longstanding tradition at our school. We have been doing it for decades and it raises quite an astonishing amount of money (in the thousands). For that reason, I have an extremely generous budget to work with. With that being said, however, I do have some ideas on how to make this quilt a bit more pocketbook friendly.

Now for the good stuff.

The Process (and it certainly was a process!)
We started this project back in November (we would have started in October has Superstorm Sandy not pushed us back a few weeks!), but having all of our 5th-8th grade students (about 250-300 kids) draw pictures with the theme of the Kentucky Derby. We supplied them with paper, pencils, erasers; they brought in printed out pages with ideas of things to draw. Tracing was not allowed, although they were allowed to replicate what they were looking at. We did this in two sessions and collected all drawings at the end of each session.

After all of the drawings were collected. We sifted through the piles to narrow down the contenders. Typically between 12 and 18 drawings are selected, however I like to be difficult so we selected 30. There were so many wonderful drawings, how could we stop at just 15?!

After the drawings were selected we scanned each one in to Photoshop and cleaned up and spots that occurred from the scanning process. We also made any minor necessary edits to the photos (resizing, too dark shading, etc.). Additionally, we removed some accents that we would add in later in the process either through the coloring or embroidery (like tufts of grass). Once the black and white drawings were all cleaned up we printed them off on special watercolor paper.
(Here is a drawing that has been scanned in, but not cleaned up yet)

With the help of a member of the senior class, all of the drawings (now on the watercolor paper) were colored in using water soluble crayons and water soluble colored pencils. They work by coloring like you would any crayon or colored pencil, but when you brush over them with a damp paintbrush they look as if they have been water-colored. We chose this route to avoid having inconsistent drawing lines (you know when you start coloring in one direction and then switch to another and it looks all funky), and it worked out beautifully.
(One of the "water-colored" images)

After the images had been colored they were scanned once more, cleaned up in Photoshop again, and then sent off to the printer. Now, we wanted to have 9" blocks which meant we needed 9.5" (for seam allowance) plus more for some room to square up. This meant that we needed to opt for 11"x17" fabric sheets. There are a couple of downsides to this, the first being that the bigger the fabric sheet, the more expensive. That's the obvious thing. The less obvious thing is that these need to be printed on an inkjet printer, not laser... which means no running it through a copy machine. You have to actually find someone who has an inkject printer that takes 11"x17" paper-- not an easy feat. We did find someone, but it ended up costing us $7 per page (multiplied by 30+) just to have the images printed out (and that was a discounted rate for being a fundraising project!).

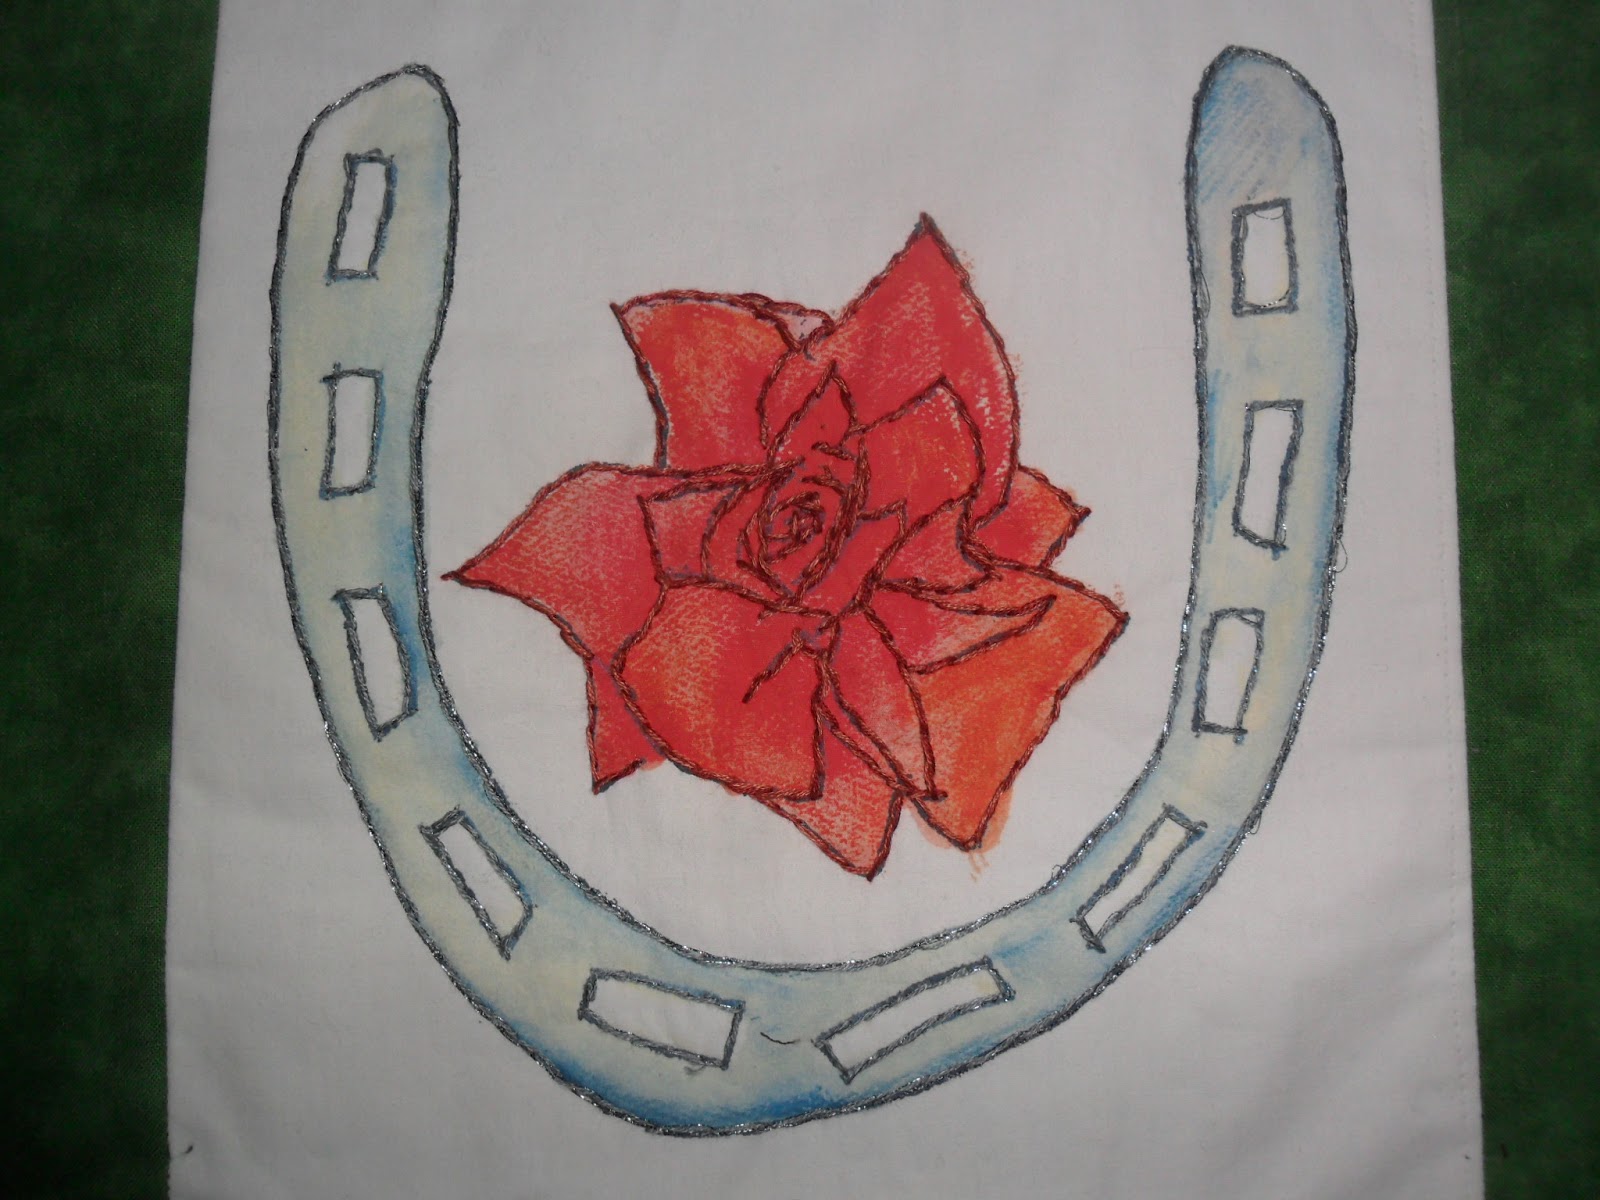
OK, so, now we have all these images printed out on fabric. They look fabulous just like that, by the way. Next they all got distributed to parents, faculty, and friends to start embroidering. We have each embroiderer the fabric with the drawing on it, a flannel backing sheet, embroidery threads, a hoop, and instruction. We offered stitch and bitch sessions every Wednesday for a month for people to see what others were doing, ask questions, get help and suggestions, and to turn in their projects. We have a lot of freedom to our embroiderers to use whatever stitches they wanted and to add embellishments. On the picture above of the two kissing horses for example, the parent added leather strapping to make the reigns instead of stitching them out in thread.


Above are two examples of the evolution through the process, 
from child's drawing to finished embroidered block.

Once the embroidered fabric was returned to me I assembled the top using a very traditional, standard top with sashing and boarders, then quilted and bound it together (remembering to include a sleeve along the top for hanging).  I also created custom fabric for the back with the event logo and artwork.

The final size of this quilt ended up being approximately 63"x74", and cost us about $750 to make.

Here are some ideas/tips to make it for less.

  • have the kids create their own blocks by painting the fabric themselves.
  • try a crayon transfer of artwork like in this tutorial
  • if you really like this method, create a quilt design that uses smaller blocks or rectangles and use the 8.5"x11" fabric sheets that can be printed on your home printer (so long as it is inkjet).
  • try this project in a smaller scale... use only 10-15 drawings.

I hope you enjoyed this rundown of the process, and please feel free to contact me with any questions. This was the first time we've done the quilt like this (in the past we have always hand appliqued blocks together based on the drawings of the children), and I learned so much. I am happy to share it with you.

I hope you will come back at the end of April to see the whole quilt and hear how it did at auction!

Linking up with TGIFF, Can I get a Whoop Whoop!, Link A Friday Finish, 2013 NewFO Project, and A Lovely Year of Finishes. Check out my sidebar for links!

Monday, March 25, 2013

In Stitches Over Stitch Me Up

First, thanks for stopping by my stop on the Stitchin' Express. As usual, Mdm. Samm has put together a wonderful program, and our cheerleader Jane (from Jane's Fabrics) has been so great too! For those of you who may not be aware, the Stitch Me Up Blog Hop is sporting some fantastic designs. We got to choose from pages and pages of designs for all skill levels, which was great since I had never stitched a stitch in my life! 


When I saw the Stitch Me Up opportunity with Madame Samm I got really excited, which is odd in and of itself. I mean, its not like I had any interest whatsoever in embroidery. I hate sewing by hand... especially basting... and forget about binding by hand!

Why then did I take one of Madame Samm's super exclusive spots
in her embroidery hop are you asking? 

Well, I was getting ready to embark on the school's auction quilt where this year, unlike any other, we would be hand embroidering the whole thing. Having never done embroidery, I thought the hop would be a good exercise in learning some stitches before I worked on the monster quilt. All of this would have been great had I not been given the quilt squares to do before the hop pattern. Oops.


Here are three blocks from the school's auction quilt. All (thirty in all) of the blocks feature middle school artwork that was water-colored (by an awesome high school student) and then printed onto fabric. From there, they were hand embroidered by parents and staff at the school. Once the quilt is done I plan on putting together a detailed post on how it was created for those who are interested, so definitely stop back or become a follower!!


Well, I still had a lot of fun working on it. And I did get to try out some new stitches on it. I even bedazzled it a bit (check out the dog tag, the lady's ring, and an earring)! I haven't decided what I will use it for yet. I'm thinking once I have some time I may make a couple more ladies and put it into a quilt... or maybe make a bag... or maybe something else... I'm not totally sold on an idea. I'm up for suggestions if anyone has any.

A special thanks to Madame Samm and Jane. Now go take a look at my hop-mates!


MONDAY MARCH 25th

Beverly @That Other Blog

Thursday, March 21, 2013

A much needed break from quilting


I've been trying to find a dress for Little Loo that will coordinate with Diva's dress for their cousin's First Communion in May but to no avail. Then a couple of days ago I was at the mall with the girls when I thought I spotted one! ... But alas, it was too big for Loo. Diva looked up at my disappointed face and told me "you'll just have to make one, Mommy." Not what I had wanted to hear.

I had already been toying with the idea after seeing so fabric that would coordinate well, but I don't really do clothes. Nevertheless I picked up a pattern on the off chance I went for it, since it was on sale for just a buck. Well, I went for it, and I have to say I am rather pleased. I'm still not sure I will use it for the First Communion... it has to pass my mother's test first (not that she is a sewer, but rather a shopper extraordinaire); it has to look as good as something that was bought in the store. It's definitely not perfect, and there are some sizing issues (although Loo might just grow into it perfectly by the time May rolls around, but I think it might pass the test. Loo seems happy with it at least!
Linking up with:  photo blogbutton_zpsb1fa0f6d.jpg

Monday, March 18, 2013

Thank heaven no one ever sees the inside of a quilt!

I know you all know what I'm talking about!

I designated the school's auction quilt to be my March project for A Lovely Year of Finishes over at Sew BitterSweet Designs. I'm pleased to announce that I have gotten all of the blocks in and sewn together the top almost entirely (still need to add the final border).

So here it is. I'm really proud. I've put this top together twice now, and have ripped out more seams than I can remember. The trouble I was having was that some of the blocks have embroidery (and other stuff like suede strapping and french knots and things) that runs into the seam allowances wreaking havoc on perfectly straight seams. All in all, to the naked eye it looks pretty even, with only a couple of areas that are slightly off, despite the fact that the quilt is 3/4 of an inch bigger along the top than across the bottom. Shhhhh, that's our secret... got it!

And now, for the winner of my McCall's Pattern Giveaway: Congrats Carmen N.!


Friday, March 15, 2013

Thoughts on the Hoffman Challenge

Like many other quilt shows, the NJ Quilt Expo hosted the 2012 Hoffman Challenge. I can't really say I'm a fan of the fabric requirement. I've seen the fabric at two other shows and have not really gravitated towards any of the pieces, however I found one that really struck me this time. Perhaps it is because my mother is a survivor, or maybe it was just the way that the quilt looked sophisticated and feminine. I don't know who made this... (I really need to do better in the future of taking photos of the info sheets), but I just love it. Everything was right... the color choices, the use of beading and 3D elements in parts, the placement of the flowers, and the words "Life is beautiful" and "fight for a cure" quilted on to the piece. By far, this was my favorite from this collection at the show.