Friday, November 5, 2010

Peacock on Parade

 So, the whole purpose of me buying a sewing machine and learning to sew in the first place was to be able to make my daughter's Halloween costume. The experience was... interesting... and not having any patterns or templates to go by I just had to wing it (no pun intended).

So for my Diva's 2nd Halloween, and my first unsupervised "clothing" sewing project, I decided to make a peacock costume. The costume was 25% store bought, 25% hot glue gunned, and about 50% sewn. Not too bad considering I had no idea what I was doing,, or how hard it might be. This project was all about short cuts... whatever it took to create the desired effect!

I started off with a store made leotard. Because my daughter is so small, and because she is still in diapers, I needed to make a few adjustments. I shortened the sleeves, and added snaps to the crotch for easy access.
For the skirt, I cut a "circle" skirt from some satin fabric, though it was more oblong, to create a short in front yet long in back look. I lined it with a cotton fabric of the same color and sewed in some elastic to give it a stretchy waist. Then, using a store bought boa from the dollar store, I edged the entire hem. The underskirt consisted of tulle of various peacocky colors that was tied to another piece of elastic to fit her waist.

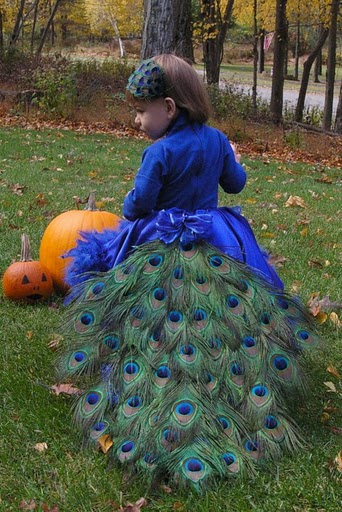
The tail, which is my favorite part, was by far the easiest to make. I bought a fan from the dollar store and hot glue gunned the peacock feathers onto it. It was super easy, and kept the feathers perfectly fanned out. Then I just pinned the handle of the fan to the skirt and added a bow to cover up the pin. A store bought headband finished the look. Viola! My first unsupervised sewing project. Not too shabby.

Saturday, July 24, 2010

Tote Bags

This tote bag was the very first sewing project I did all on my own. I had made a similar one with my instructor in our second class but I didn't like the material she had asked me to use... a shapeless, lackluster cotton. So, as soon as I could, I got myself to the local-ish fabric store and picked up some quilted, reversible fabric. I also modified the design a bit to include a large magnetic snap. Because the bolt of quilted fabric was a tad bigger than the cotton, but bad came out larger... which was totally fine with me! I use it for everything. I think next time I try one, I may attempt adding some pockets somewhere, or a zipper if I ever learn how.

Thursday, June 17, 2010

Princess Tea Party

Ever since my daughter's first birthday cake, I seemed to have claimed the title of family cake baker... For her very special 5th Birthday party with all of her friends, my niece decided that she wanted a "Princess Tiana Tea Party." My sister-in-law asked me if I would consider making her a special cake to go with the theme. I agreed under the condition that I could just do something and show up with it with no direction from her, my brother, or the birthday girl. What I came up with was this:


I surprised her with this teapot cake, which include some of Princess Tiana's favorite colors and lots of edible glitter! The cake itself was a strawberry cake, made with fresh cut strawberries, and a light cream cheese filling. It's covered in fondant, and all of the flowers and embellishments were hand made. I even make the candle holders which were purple gumpaste rosebuds.

Friday, April 23, 2010

A Farmy First Birthday

So, I started my hand at cake decorating because i wanted to make my daughter's first birthday cake. I wanted to have one of those super memorable cakes, and I had been watching a lot of the Food Network, and I mean it's not like it looks that hard to do, right? Besides, I always remembered my mom making my birthday cakes... only, they never looked quite like this.


The bottom two layers of the homemade farmy first birthday cake were red velvet with cream cheese filling. This was the first stacked cake I have ever done, so needless to say I was nervous. But I thought really hard about how I was going to get everything done before I started, which helped a lot. 


Since I made the top of the cake (the barn) out of foam (the two layers of cake was already going to feed about 50, so I didn't need MORE cake!), I was able to work on it several weeks in advance. I covered the whole thing in red and then placed strips of black on top to form the roof. I then wet the strips and covered them in poppy seeds to give a shingled effect. 


I was also able to make all of the animals ahead of time,so when I was ready I could just place them all on. The actual cake layers I worked on the week of the party. My husband had to help me put the fondant on the bottom tier since it was too large for me to cover on my own. It actually came together really quickly. 


After the two bottom tiers were covered, it was maybe 5 hours to assemble and finish all the details. The back of the homemade farmy first birthday cake has a cow and a banner hanging on the barn that says "Happy Birthday." Also there is a duck on the side swimming in a pond. 


I crushed some blue jolly ranchers and put them in the oven at 350* for a couple of minutes to make a sugar pond. I also made a separate smash cake with a fondant pig rolling in mud (chocolate icing on yellow cake). Diva loved it and so did everyone else!