Showing posts with label sewing. Show all posts

Saturday, July 21, 2012

Up the Creek Without a Paddle

I'm not entirely sure how, but I finished my block early this week... like real early-- as in, before the weekend hit. I'm speechless. Here it is for your viewing pleasure-- Paddle up the Creek.


Can I also just add that since this was the first time that my back has come out perfectly... flawless actually, I felt the need to share that picture too. Isn't it perttty?

Ok. Enough of that. I feel I need to clarify something. Despite the fact that my last SEVERAL posts have been about quilting, this is not a quilting blog. It's just that, well, with a two month old and three year old running around the house I haven't had time for much else, and for whatever reason doing a little bit of sewing seems to help me unwind and relax. Fear not, however. There is a cake that will make it debut after Little Loo's Christening in September... yes, I am crazy enough to do the cake for my own daughter's Christening. Plus I have a couple of other projects that I hope to complete between now and then, including a reorganization/redesign of the office/play room/sewing area. Was that enough slashes for ya?

Thursday, July 19, 2012

(Not) Going on a Picnic

This week the heat has been absolutely brutal, and the thought of doing anything outside almost brings me to tears. Unfortunately, or fortunately I guess, Diva is signed up for swim lessons and is destined to be a beautiful mermaid by the end of the summer. The unfortunate part is that I've had to haul Little Loo into the unbearable heat this week, and even though lessons are at 9:45am it has still been 90 degrees the last couple of mornings.

That being said, once I managed to get home getting into my sewing room has been last on the list of things to do. But I still managed to do it! I finished my block of the week entitled Going on a Picnic.


I also tried a new tool this week- the Perfect half-square and quarter-square triangles ruler by June Taylor, Inc. I actually bought this ruler for my cake decorating believe it or not... so since I had it I figured I might as well give it a go for its regular intended use. Maybe its because I already had a way that worked for me, but I wasn't a fan of this ruler. The way it works is like this: First you mark your sewing lines using the left side of the ruler. Then you sew down the lines, bring the stitched block to the right side of the ruler and cut the triangles apart, and press open. Then you use the grid in the center to square everything up.

At first I thought I really liked it. Drawing the lines meant I had a nice guide to sew off of, and cutting the square in half was a cinch too... but that damn squaring up nearly cost me my fabric. Something just wasn't working for me and I nearly lobbed off a quarter of an inch on one side. Oops. I'll give it another go...  but definitely on some scraps next time.

Sunday, July 15, 2012

Falling Behind

Two months ago my newest little princess, Little Loo, decided it was time to make her debut... a month early! All things considered I've been keeping up with things quite well, but for whatever reason this week I seemed to be falling more and more behind. In everything. Laundry, grocery shopping, and definitely with this blog. I've decided since today is her two month birthday I would take this opportunity to post some photos of her room in addition to my BOW.

Here is the view from the door. We decided to keep the same theme from when we had our first daughter, Classic Winnie the Pooh. The sign above the tree reads: 
"Twinkle twinkle little star, Do you know how loved you are?" 
The quilt on the ottoman was given to me at my baby shower by a former co-worker. I used it with the first daughter all the time, and I'm happy that it has found its spot in this room as well.

Over the crib is a quote from Winnie himself that reads: "Sometimes the smallest things take up the most room in your heart." Truer words have never been spoken. 

As for last weeks Block of the Week, it happens to be called Count the Stars, which I guess works with my Twinkle, Twinkle sign! 

I'm not super thrilled with my fabric choices for this block. There just isn't enough contrast. Lesson learned I suppose. The photo quality doesn't help either, since I think it does look a little better in person than in the picture, but it will be fine for this project. I still haven't decided what I will be doing with this quilt once it is done. I may go ahead and donate it to a charity, or perhaps I will save it for when a friend is expecting a little girl. We shall see...


Tuesday, July 3, 2012

Jump in the Pool

This week's block of the week was entitled "Jump in the Pool" and I found it so fitting. With the 90+ degree heat here in NJ, and the 4th of July holiday upon us it all just seemed to make sense.

Among other things, this  week's block was a great review of the techniques we learned the last 3 weeks, and I found it comforting and encouraging that I could just look at the block and know how to make it without going back to review the instructions from previous weeks.


This quilt along is giving me so much confidence, and I want to try more and more things. I've started doing some research on learning how to do paper piecing as I have my sights on creating a quilt for Diva's school's auction. She's only 3, and the school goes through high school, so I figure I have plenty of time to finish it... if not for this year's auction there is always the one 15 years down the road!

Until next time, I hope everyone has a safe and happy 4th of July! 

Sunday, June 24, 2012

Conquering Your Fears

I put off trying quilting for a while because it scared me. All that precision and mathematics. I mean, don't get me wrong, I'm not bad a math... it's just, I used to think I would never have the patience for anything like that. When I had my baby shower about three and a half years ago, I received two quilts handmade with love-- one from a coworker and the other from my mother-in-law's best friend. I admired the hard work that went into making them, and I cherished the gifts made with so much love. But I never would have the patience for something like that.

Fast forward about a year and a half. I started making cakes for family and friends, and I wasn't half bad from the get-go. Everyone kept telling me that I must have a lot of patience. Me? Doubtful. Then again, perhaps I do.
The teapot cake I made for my neice's 5th birthday 2 years ago.

Then in September of this past year I was in JoAnn's waiting to get some fabric cut with my daughter in the shopping cart. I started talking with the woman behind me in line who asked if I quilted. I told her no, that I didn't have the patience. She encouraged me to give it a try. I tucked the conversation away in my mind. When I found out I was pregnant again, about a month later, I decided to give it a try.. nothing fancy, just a kit for beginners. It would be enough to have to worry about corners matching up without dealing with triangles and other sorts of craziness! 

Well obviously, I loved the experience because two weeks after I finished my first top, I made another! Now two quilts down, and I started this Beginner's Quilt Along hosted by Quilting Gallery. I'm so glad I did. This week I learned how to make those pesky triangles, and honestly they were super easy. I wasn't able to make them the way I was instructed because I couldn't find my marking pen, but I used my brain (man that feels good every once in a while!) and figured out another way. And when I sewed the whole thing together it was as perfect a block as I could have wished for. All the corners lined up and everything!

Last week I followed a blog hop that was giving tutorials on Dresdens and I thought to myself, no... never. Honestly, though, after seeing how stupidly easy doing triangles were with proper instruction and tools I would totally give other shapes a try. But appliques, those might be a different beast. Baby steps, right?

Friday, June 22, 2012

What do you see?

 A few posts ago I mentioned that I made a second taggie quilt for my sister-in-law who is expecting her second bundle of joy later in August. When I saw the Brown Bear, Brown Bear fabric a few months back I knew it would be perfect.The quilt pattern is of my own design, and had I been a bit more experienced in the process I would have assembled it much differently! Nevertheless I prevailed and a lesson was learned in what not to do.


I love all of the different textures for the babies to feel on the taggie quilt. In addition to the taggies, I used some red ribbon to make an interior boarder on the top. It adds a great pop of color too.


I absolutely love the way it turned out.

Sunday, June 17, 2012

Peek Over the Fence

After many trials and tribulations this week with my sewing machine, I finally was able to complete block two of my beginners quilt along. After I posted yesterday that my machine was broken and then fixed, it started to malfunction again. What a headache! I might be ready for that new machine sooner than I initially thought...

Anyway, I decided to change my thread from a cotton one to a polyester one and all of a sudden everything started working again. Hooray! So I quickly finished my block before there was time for anything else to go wrong... Here's my block.

This whole block of the week thing is interesting. Not only am I learning some new techniques and working on my skills, but I am learning a lot about my machine. I never thought I would enjoy this so much. 


Beginner’s Quilt-Along

Saturday, June 16, 2012

Clearly not my lucky day... or is it?

So, I have been diligently waiting for this weekend to find out if I won any of the Dresden ruler giveaways that I put my name in to. Naturally I didn't win... not that I expected to. I mean, the odds were slim, but I had hoped. But that's not really why I was unlucky. The reason for my unluckiness was because my sewing machine broke... or so I thought. Here's what happened.

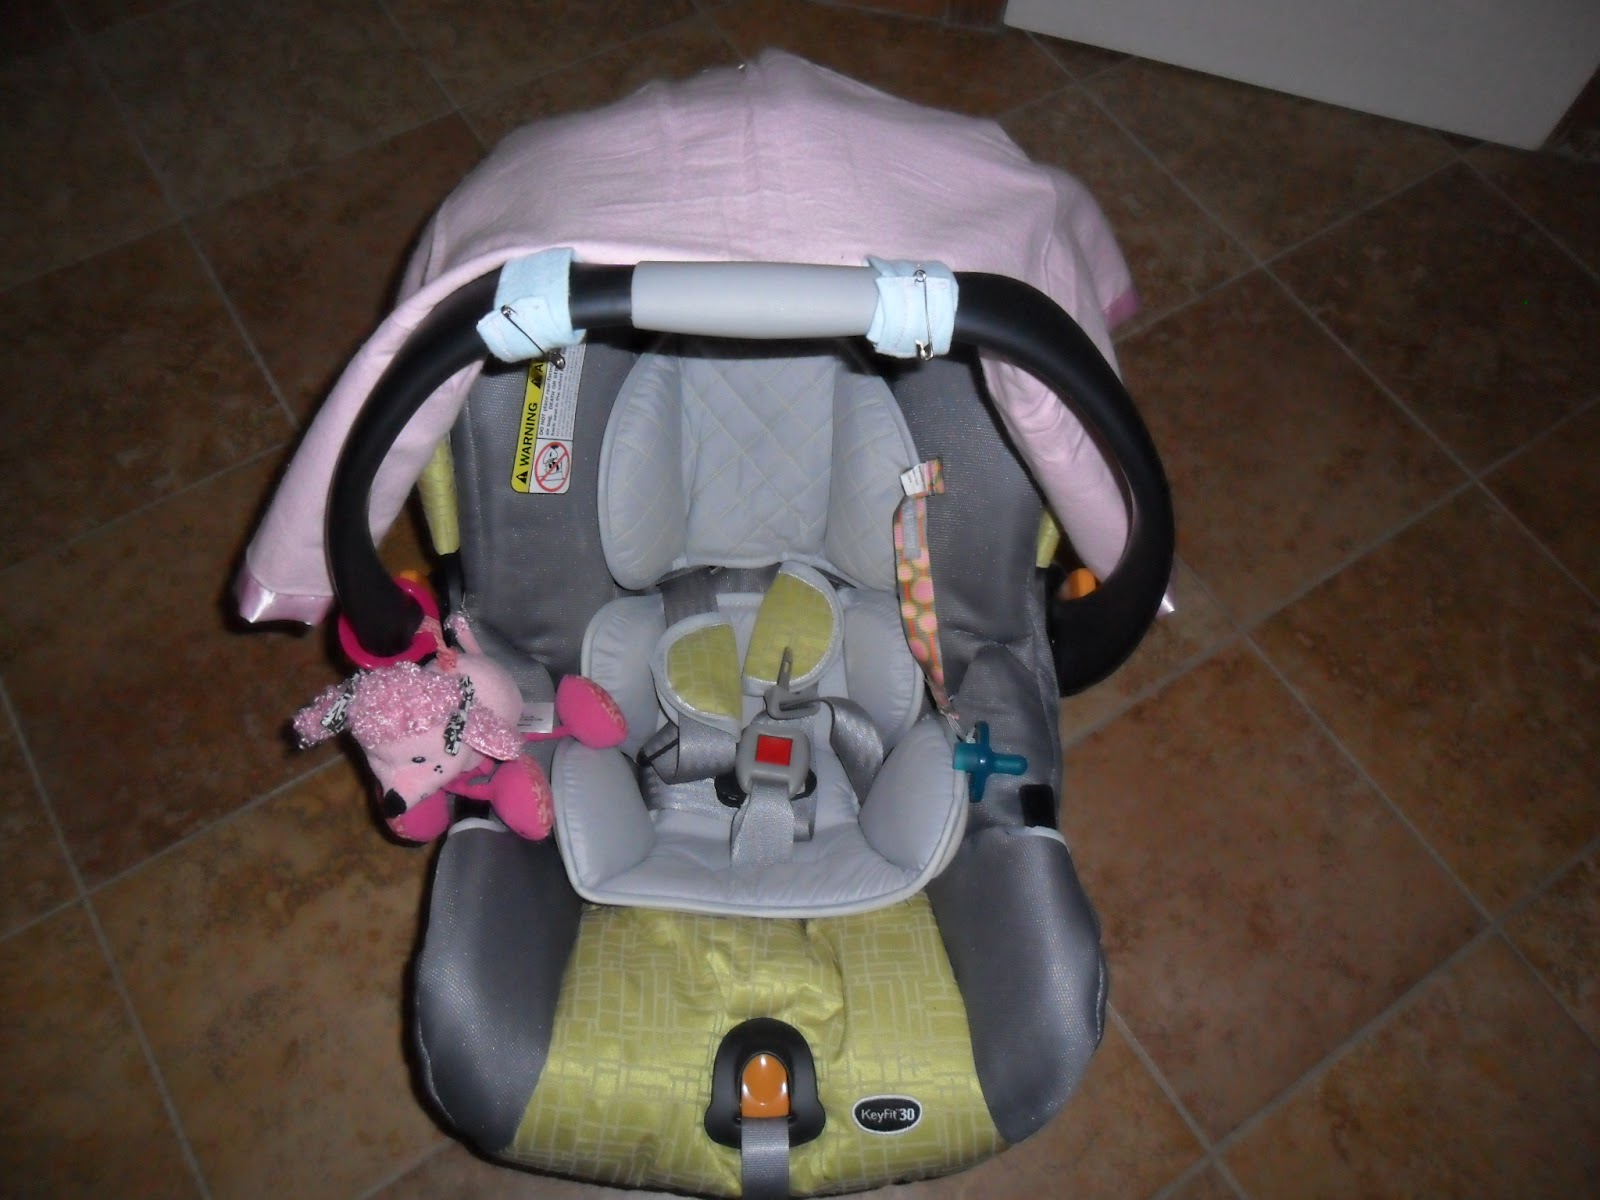
Yesterday I was minding my own business sewing a makeshift carseat canopy. I was tired of heading out to the store and having strangers get just a bit too close to my new princess, and I was finding that if I just threw a blanket over the carseat handle the wind, or my other daughter, would send it flying off. So my quick fix solution was to take a heavy flannel Carters blanket that someone had given me for the birth of my first daughter (but that was still in its package!), and sew straps to it that would velcro around the handle to secure it in place. Everything was going great. I sewed my straps, attached them to the blanket, and sewed the stiff part of the velcro onto both straps, no problem. But when I went to attach the soft part of the velcro my sewing machine stopped working. Well, not exactly. The needle went up an down, but the fabric didn't push through. Check the feed dogs. Nope they were up... only, they weren't.


After finally managing to get the metal plate over the feed dogs up (it took a nickel to get under the throat and still have room to turn the screws), I realized it was a spring issue. After a time spent fiddling, and what to any one watching would have looked like a game of "Operation" complete with tweezers, a brush, and a screwdriver. I thought I fixed it, but the mechanism still wasn't working properly. I called the local Sew and Vac machine and was informed it would take two weeks and half of what I spent to buy the machine (granted the machine was pretty inexpensive since it was a first machine and I didn't know how much I would really be using it...) No way. I'd rather save the money and put it towards a new and better machine (sigh, next year... next year).


Cue my husband, who took the whole machine apart and figured out that the feed dogs had disengaged and all I needed to do was to turn the wheel to re-engage them. Oy. So now I just need to go and test it out by finishing my project. And then its off to work on my block of the week. Wish me luck!!


~~**UPDATE**~~
With only 2 seams left on my BOTW my machine broke again... this time the top thread keeps getting tangled below the feed dog plate. Clearly there is a bigger issue.

Monday, June 11, 2012

A Handy Little Foot

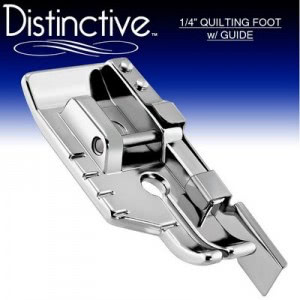
So, being new at quilting I obviously still have a lot to learn and perfect. One of those things, which happens to be extremely critical, is sewing a straight and even 1/4" seam. Ugh. After sewing block 1 of the quilt along less than stellarly (is that even a word?), I came upon this.

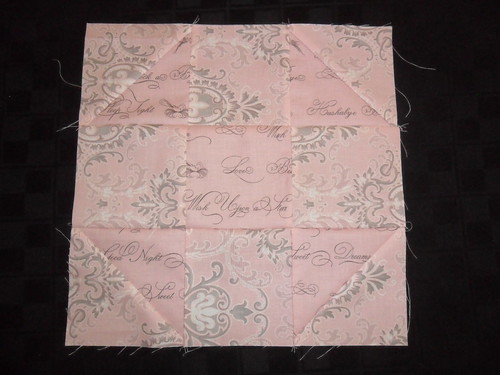
This handy little foot ensures a nearly fool-proof method to sewing that 1/4" seam. I decided to go ahead and order it since the $9 it was going to cost me probably outweighed the aggravation of pulling out seams because they were no good. As soon as a got it in today I had to try it out... and let me tell you, it's like magic. Take a look at the difference between my new block 1, and the one from my last post. All my points match up, all of the squares are straight, and remarkably, my block is actually the correct size. I didn't even have to trim it! I think I'm in love...
While I was shopping at Amazon I also picked up two other feet. One is a tape binding foot and the other is an edge joining foot aka a stitch-in-the-ditch foot. I'm excited to try them both out and will report back once I do.

Sunday, June 10, 2012

The Fabric Is In!

My fabric arrived for my blocks for the quilt along yesterday, and it is exactly what I had hoped it would be. It's called Puttin' on the Ritz (in Pink) by Moda and it is perfect for a little girl's room. The fabric is a mix of pinks, creams, and greys and the designs include scrolling, dots, crowns, and more. There is even some fabric with text that says things like "Sweet Dreams," "Sleep Tight," "Wish Upon a Star," and the like.

Once the little ones were sleeping, I decided to go ahead and get started on my first block. The block is a standard 9 square, but for the purposes of this quilt along they have named it "Play a Game of Hopscotch." As I looked at the 12 different fabrics included in my stack of fat quarters I was drawn to a plaid print and a delicate floral print for this block. I cut out my 9- 4.5" squares and set to work.
Unfortunately, having misread the instructions I trimmed my square down to a 12 inch block instead of leaving it a 12.5" block. The block is supposed to be 12" after assembled into the quilt... oops, my bad. So I will have to re-assemble this block again. Fortunately I have enough fabric, and its a good excuse to practice getting my corners matched up perfectly since I missed one on this block. It also prompted me to spend the $10 on a new foot for my sewing machine that has a guide for a 1/4 inch seam... something I desperately needed. Once the foot comes in I will go ahead and assemble the new block to use for the quilt. I'll try to remember to post it when I'm done.

Friday, June 8, 2012

My First Quilt Along

Ever since I did that first taggie quilt a few months back I got bitten by a little quilting bug. I began following some blogs, I made another quilt for my sister-in-law who is pregnant with number 2 (post about that coming as soon as she gets me a couple of photos. I CANNOT believe I didn't take any photos of it!!!), I bought some fabric that I loved for when I find out someone else is pregnant (I just adore the fabric for children!), and I even went to a quilt show in Lancaster, PA with another quilter I know. Anyway, as I was reading one of the blogs that I follow (http://quilterinthecloset.blogspot.com/), Jen mentioned she was doing a beginner's quilt along. After checking it out, I decided it seemed manageable and not too time consuming... after all I did have a baby 3 weeks ago! I have ordered my fabrics and am looking forward to them coming in so I can get started.

Here's what I chose:
blocks in: Puttin on the Ritz by Moda

Boarders, sashings and backing in: Ooh La La by Moda

For more info on this quilt along (it runs through September) check out The Quilting Gallery.


Beginner’s Quilt-Along

Thursday, January 5, 2012

Baby Changing Pads

 So, can I just tell you that i Love, LOve, LOVE this tutorial by Jill of Homemade by Jill. I've made two already, and know I'm going to make a bunch more. They are perfect for new moms and baby showers... and I'm thinking about making one in smaller scale for my daughter to change her baby dolls on too! The tutorial is so easy to follow, even for a novice sewer like myself. And they come out just so darn cute!


The one thing that I really love about these is that the inside calls for a laminated fabric. I took it one step further and purchased that sparkley vinyl fabric that you might use to upholster a 50's style bar stool. It wipes down so nicely which is perfect for those special occasions when things get a little out of hand. The fabric is a little expensive, but well worth it.

Sunday, December 18, 2011

Just Like Mommy...

Diva is just starting to really get into dolls lately, so I thought it would be cute for her to have a sling to carry her baby around in. Since we will be welcoming a new baby to our house in a few months, the timing is perfect for her to get into the whole Mommy thing. When she was little I used a sling all the time, and I figure I'll probably do it again-- so now we will be able to match when we go out to the park or are just playing around the house.
The sling was super easy to create. I went online and found two tutorials that I like and sort of combined them... parts from Koala Brains and this one from Momma's Milk. I did however, make mine reversible by sewing two fabrics (wrong sides) together, instead of just folding the fabric as Momma's Milk suggests. I also didn't worry about reinforcing the bottom seam since dolls aren't very heavy, and my daughter drops them on the ground anyway. Oops.

Friday, November 4, 2011

Tinker Bell Costume

For Halloween this year, we decided to go as a group costume. My husband would be Captain Hook, I would be Peter Pan, and Diva wanted to be Tinker Bell. As I looked around at Tinker Bell costumes on-line, I was really disappointed. None of them actually looked like Tinker Bell! There was only one thing left to do... I had to make it. Seeing as how last year's costume wasn't a total disaster I felt up to the task.
I created a tube dress out of some satiny fabric and sewed it to a flesh colored leotard (good thing too since we had a freak snowstorm in NJ just a few days before Halloween!). For the wings, I was a total sucker and made them myself too... note to whoever thinks about trying to make their own fairy wings. DON'T! Just buy the cheap-o ones... you'll thank me later. I also made her a matching pixie dust bag to hold all of her trick-or-treat goodies. I used this tutorial, but modified the size.

All in all I was happy with how it came out, and she had fun in it.

Friday, November 5, 2010

Peacock on Parade

 So, the whole purpose of me buying a sewing machine and learning to sew in the first place was to be able to make my daughter's Halloween costume. The experience was... interesting... and not having any patterns or templates to go by I just had to wing it (no pun intended).

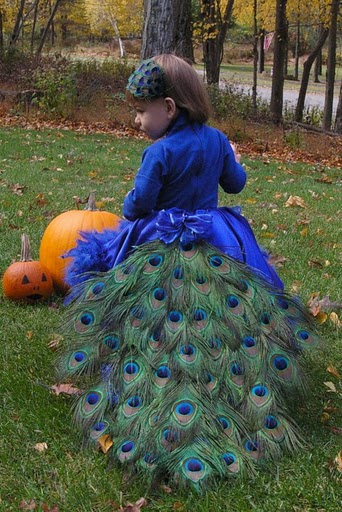
So for my Diva's 2nd Halloween, and my first unsupervised "clothing" sewing project, I decided to make a peacock costume. The costume was 25% store bought, 25% hot glue gunned, and about 50% sewn. Not too bad considering I had no idea what I was doing,, or how hard it might be. This project was all about short cuts... whatever it took to create the desired effect!

I started off with a store made leotard. Because my daughter is so small, and because she is still in diapers, I needed to make a few adjustments. I shortened the sleeves, and added snaps to the crotch for easy access.
For the skirt, I cut a "circle" skirt from some satin fabric, though it was more oblong, to create a short in front yet long in back look. I lined it with a cotton fabric of the same color and sewed in some elastic to give it a stretchy waist. Then, using a store bought boa from the dollar store, I edged the entire hem. The underskirt consisted of tulle of various peacocky colors that was tied to another piece of elastic to fit her waist.

The tail, which is my favorite part, was by far the easiest to make. I bought a fan from the dollar store and hot glue gunned the peacock feathers onto it. It was super easy, and kept the feathers perfectly fanned out. Then I just pinned the handle of the fan to the skirt and added a bow to cover up the pin. A store bought headband finished the look. Viola! My first unsupervised sewing project. Not too shabby.

Saturday, July 24, 2010

Tote Bags

This tote bag was the very first sewing project I did all on my own. I had made a similar one with my instructor in our second class but I didn't like the material she had asked me to use... a shapeless, lackluster cotton. So, as soon as I could, I got myself to the local-ish fabric store and picked up some quilted, reversible fabric. I also modified the design a bit to include a large magnetic snap. Because the bolt of quilted fabric was a tad bigger than the cotton, but bad came out larger... which was totally fine with me! I use it for everything. I think next time I try one, I may attempt adding some pockets somewhere, or a zipper if I ever learn how.