
Friday, March 29, 2013
Hands2Help
Thursday, March 28, 2013
It's done!

I did it! The school's auction quilt is FINALLY done! AND I managed to get it done by my personal deadline of the end of March. The auction is until the end of April, but since April is an especially crazy month, I was determined to get it done by Easter. I'm told the quilt has never been finished this early, so hooray for me!
Now, I'm sure you all want to see the finished quilt, but I'm sorry-- you are just going to have to wait! I hope you can be patient. I'd like to get some really nice, quality photos of it, and then make one final post of it after the auction, along with how much it ends up going for.
In the mean time however, I thought I would take you through the journey of how this quilt came together. I've been getting a number of comments and question about what a great idea for a school fundraiser this is, so I thought I would lay out how I did it, and give some modifications for how it could be done for your fundraiser.
First, let me clarify something. The auctioning off of a quilt full of student artwork is a longstanding tradition at our school. We have been doing it for decades and it raises quite an astonishing amount of money (in the thousands). For that reason, I have an extremely generous budget to work with. With that being said, however, I do have some ideas on how to make this quilt a bit more pocketbook friendly.
Now for the good stuff.
The Process (and it certainly was a process!)
We started this project back in November (we would have started in October has Superstorm Sandy not pushed us back a few weeks!), but having all of our 5th-8th grade students (about 250-300 kids) draw pictures with the theme of the Kentucky Derby. We supplied them with paper, pencils, erasers; they brought in printed out pages with ideas of things to draw. Tracing was not allowed, although they were allowed to replicate what they were looking at. We did this in two sessions and collected all drawings at the end of each session.
After the drawings were selected we scanned each one in to Photoshop and cleaned up and spots that occurred from the scanning process. We also made any minor necessary edits to the photos (resizing, too dark shading, etc.). Additionally, we removed some accents that we would add in later in the process either through the coloring or embroidery (like tufts of grass). Once the black and white drawings were all cleaned up we printed them off on special watercolor paper.

(Here is a drawing that has been scanned in, but not cleaned up yet)
With the help of a member of the senior class, all of the drawings (now on the watercolor paper) were colored in using water soluble crayons and water soluble colored pencils. They work by coloring like you would any crayon or colored pencil, but when you brush over them with a damp paintbrush they look as if they have been water-colored. We chose this route to avoid having inconsistent drawing lines (you know when you start coloring in one direction and then switch to another and it looks all funky), and it worked out beautifully.

(One of the "water-colored" images)
After the images had been colored they were scanned once more, cleaned up in Photoshop again, and then sent off to the printer. Now, we wanted to have 9" blocks which meant we needed 9.5" (for seam allowance) plus more for some room to square up. This meant that we needed to opt for 11"x17" fabric sheets. There are a couple of downsides to this, the first being that the bigger the fabric sheet, the more expensive. That's the obvious thing. The less obvious thing is that these need to be printed on an inkjet printer, not laser... which means no running it through a copy machine. You have to actually find someone who has an inkject printer that takes 11"x17" paper-- not an easy feat. We did find someone, but it ended up costing us $7 per page (multiplied by 30+) just to have the images printed out (and that was a discounted rate for being a fundraising project!).
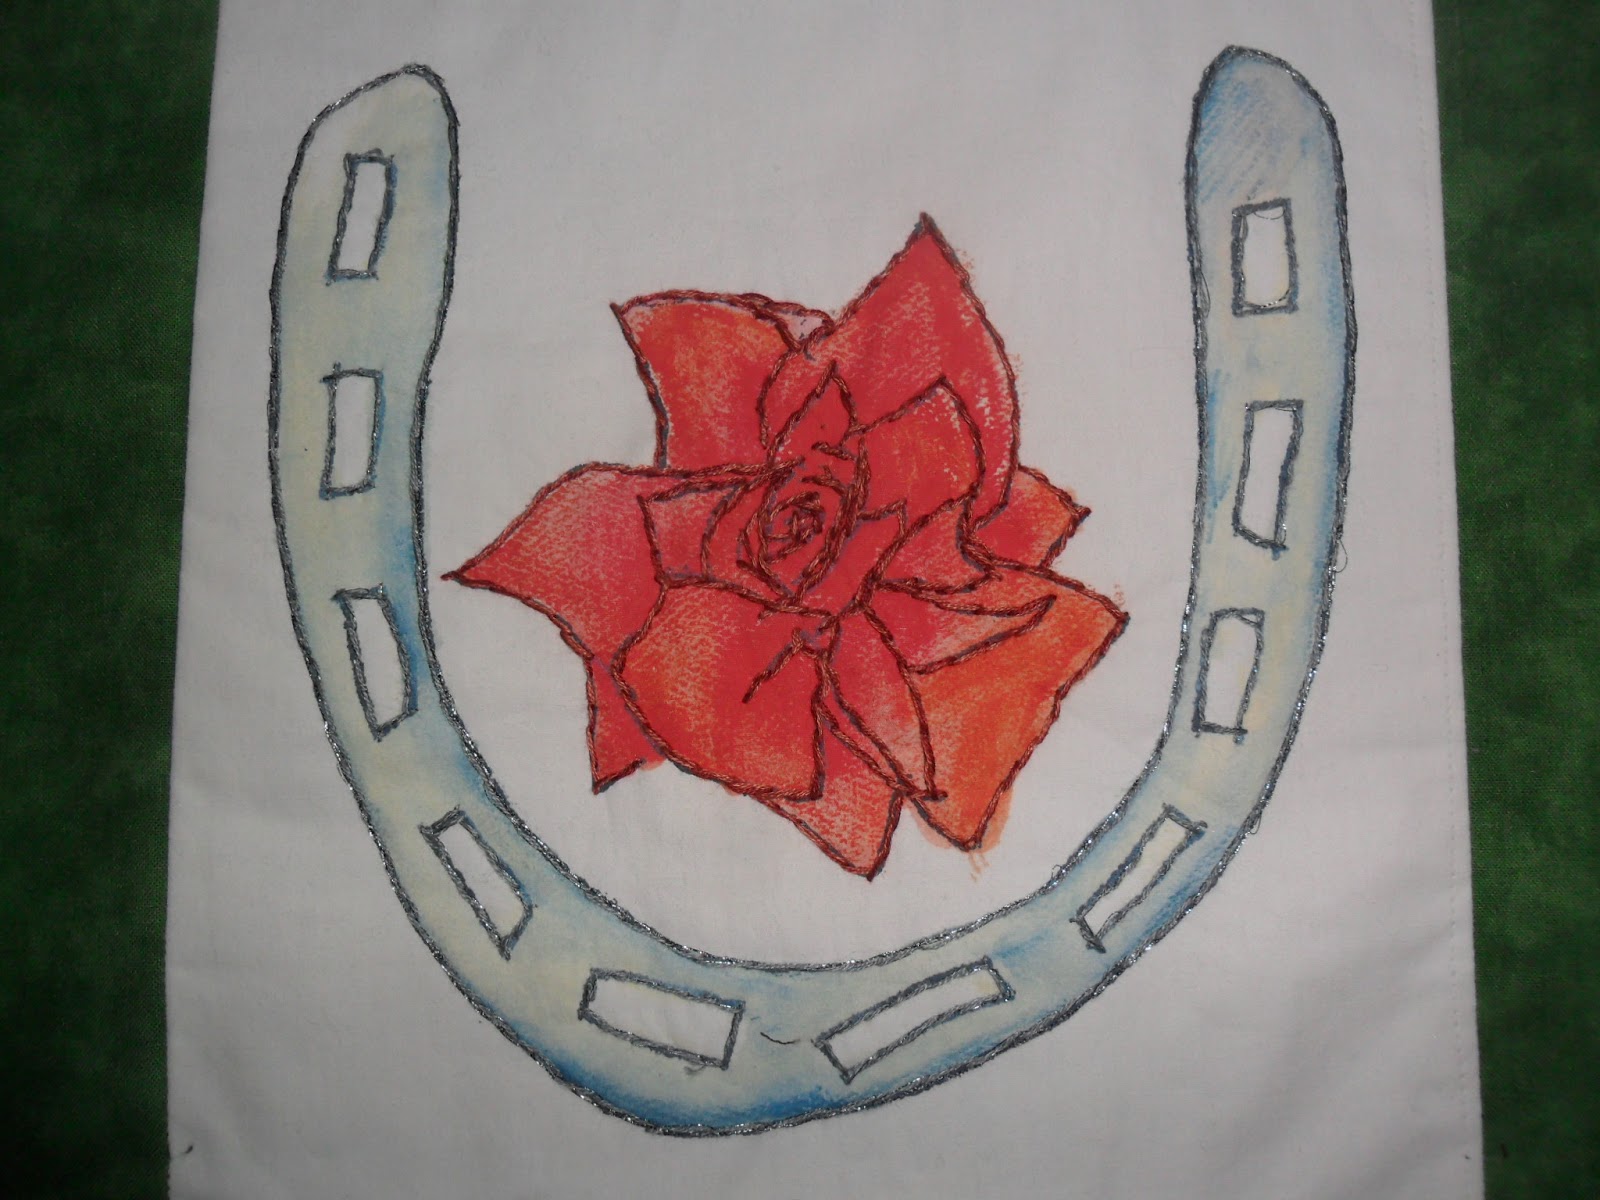
OK, so, now we have all these images printed out on fabric. They look fabulous just like that, by the way. Next they all got distributed to parents, faculty, and friends to start embroidering. We have each embroiderer the fabric with the drawing on it, a flannel backing sheet, embroidery threads, a hoop, and instruction. We offered stitch and bitch sessions every Wednesday for a month for people to see what others were doing, ask questions, get help and suggestions, and to turn in their projects. We have a lot of freedom to our embroiderers to use whatever stitches they wanted and to add embellishments. On the picture above of the two kissing horses for example, the parent added leather strapping to make the reigns instead of stitching them out in thread.

 Above are two examples of the evolution through the process,
from child's drawing to finished embroidered block.
Once the embroidered fabric was returned to me I assembled the top using a very traditional, standard top with sashing and boarders, then quilted and bound it together (remembering to include a sleeve along the top for hanging). I also created custom fabric for the back with the event logo and artwork.

The final size of this quilt ended up being approximately 63"x74", and cost us about $750 to make.
Here are some ideas/tips to make it for less.
- have the kids create their own blocks by painting the fabric themselves.
- try a crayon transfer of artwork like in this tutorial
- if you really like this method, create a quilt design that uses smaller blocks or rectangles and use the 8.5"x11" fabric sheets that can be printed on your home printer (so long as it is inkjet).
- try this project in a smaller scale... use only 10-15 drawings.
I hope you enjoyed this rundown of the process, and please feel free to contact me with any questions. This was the first time we've done the quilt like this (in the past we have always hand appliqued blocks together based on the drawings of the children), and I learned so much. I am happy to share it with you.
I hope you will come back at the end of April to see the whole quilt and hear how it did at auction!
Linking up with TGIFF, Can I get a Whoop Whoop!, Link A Friday Finish, 2013 NewFO Project, and A Lovely Year of Finishes. Check out my sidebar for links!
Monday, March 25, 2013
In Stitches Over Stitch Me Up
First, thanks for stopping by my stop on the Stitchin' Express. As usual, Mdm. Samm has put together a wonderful program, and our cheerleader Jane (from Jane's Fabrics) has been so great too! For those of you who may not be aware, the Stitch Me Up Blog Hop is sporting some fantastic designs. We got to choose from pages and pages of designs for all skill levels, which was great since I had never stitched a stitch in my life!

When I saw the Stitch Me Up opportunity with Madame Samm I got really excited, which is odd in and of itself. I mean, its not like I had any interest whatsoever in embroidery. I hate sewing by hand... especially basting... and forget about binding by hand!
Why then did I take one of Madame Samm's super exclusive spots
in her embroidery hop are you asking?
in her embroidery hop are you asking?
Well, I was getting ready to embark on the school's auction quilt where this year, unlike any other, we would be hand embroidering the whole thing. Having never done embroidery, I thought the hop would be a good exercise in learning some stitches before I worked on the monster quilt. All of this would have been great had I not been given the quilt squares to do before the hop pattern. Oops.
Here are three blocks from the school's auction quilt. All (thirty in all) of the blocks feature middle school artwork that was water-colored (by an awesome high school student) and then printed onto fabric. From there, they were hand embroidered by parents and staff at the school. Once the quilt is done I plan on putting together a detailed post on how it was created for those who are interested, so definitely stop back or become a follower!!


Well, I still had a lot of fun working on it. And I did get to try out some new stitches on it. I even bedazzled it a bit (check out the dog tag, the lady's ring, and an earring)! I haven't decided what I will use it for yet. I'm thinking once I have some time I may make a couple more ladies and put it into a quilt... or maybe make a bag... or maybe something else... I'm not totally sold on an idea. I'm up for suggestions if anyone has any.
A special thanks to Madame Samm and Jane. Now go take a look at my hop-mates!
MONDAY MARCH 25th
Beverly @That Other Blog
Betty@That Other Blog
Stitches to Sprinkles (that's me!)
Thursday, March 21, 2013
A much needed break from quilting

I've been trying to find a dress for Little Loo that will coordinate with Diva's dress for their cousin's First Communion in May but to no avail. Then a couple of days ago I was at the mall with the girls when I thought I spotted one! ... But alas, it was too big for Loo. Diva looked up at my disappointed face and told me "you'll just have to make one, Mommy." Not what I had wanted to hear.
I had already been toying with the idea after seeing so fabric that would coordinate well, but I don't really do clothes. Nevertheless I picked up a pattern on the off chance I went for it, since it was on sale for just a buck. Well, I went for it, and I have to say I am rather pleased. I'm still not sure I will use it for the First Communion... it has to pass my mother's test first (not that she is a sewer, but rather a shopper extraordinaire); it has to look as good as something that was bought in the store. It's definitely not perfect, and there are some sizing issues (although Loo might just grow into it perfectly by the time May rolls around, but I think it might pass the test. Loo seems happy with it at least!


Monday, March 18, 2013
Thank heaven no one ever sees the inside of a quilt!
I know you all know what I'm talking about!
I designated the school's auction quilt to be my March project for A Lovely Year of Finishes over at Sew BitterSweet Designs. I'm pleased to announce that I have gotten all of the blocks in and sewn together the top almost entirely (still need to add the final border).


I designated the school's auction quilt to be my March project for A Lovely Year of Finishes over at Sew BitterSweet Designs. I'm pleased to announce that I have gotten all of the blocks in and sewn together the top almost entirely (still need to add the final border).

So here it is. I'm really proud. I've put this top together twice now, and have ripped out more seams than I can remember. The trouble I was having was that some of the blocks have embroidery (and other stuff like suede strapping and french knots and things) that runs into the seam allowances wreaking havoc on perfectly straight seams. All in all, to the naked eye it looks pretty even, with only a couple of areas that are slightly off, despite the fact that the quilt is 3/4 of an inch bigger along the top than across the bottom. Shhhhh, that's our secret... got it!
And now, for the winner of my McCall's Pattern Giveaway: Congrats Carmen N.!

Friday, March 15, 2013
Thoughts on the Hoffman Challenge

Friday, March 8, 2013
Beat the Winter Blues & Giveaway!
It just goes to figure that the day the Beat the Winter Blues blog hop and giveaway starts we have inches of snow coming down! So in an effort to beat those blues I'm trying hard to look forward to spring and summer. My spring is really busy, with good things of course like Diva's and Little Loo's birthdays, but still I am finding myself skipping spring and dreaming about the lazy days of summer...
There is so much that's great about summer... sleeping in, grilling, lounging by the pool... I thought to get into the mood I would show some photos I took while at the NJ Quilt Show last week.
The quilt below is from the exhibit entitled "Red, White, and Beautiful," presented by the Gold Coast Quilter's Guild in Boca Raton, Florida. It was my favorite quilt from this collection! (Please ignore the Christmas tree on the right... despite the fact that it was beautiful, we are trying to think about summer!!)

I can not even begin to describe how amazing this quilt is. I wish I could remember who made it, but regardless this woman's vision was realized to the T. With help from her son, who engineered the pattern (over 2,500 hours!), this quilt was stunning. Hand cut, hand pieced, and hand quilted with circles spiraling out from the center. Just magnificent.
Ok, I realize that that wasn't overly summery, but it was the best I could do under the circumstances. As a heads up, this month you can look forward to progress posts about the auction quilt, and maybe even some progress posts for Diva's big birthday spectacular that's coming up in April.
And now for my giveaway: To enter just check out another post on my blog then come back here and leave a comment. Old and new followers get an extra entry, just check it off in the Rafflecopter.

Special thanks to Michele who is once again hosting the Blog Hop Party!

There is so much that's great about summer... sleeping in, grilling, lounging by the pool... I thought to get into the mood I would show some photos I took while at the NJ Quilt Show last week.
The quilt below is from the exhibit entitled "Red, White, and Beautiful," presented by the Gold Coast Quilter's Guild in Boca Raton, Florida. It was my favorite quilt from this collection! (Please ignore the Christmas tree on the right... despite the fact that it was beautiful, we are trying to think about summer!!)

Ok, I realize that that wasn't overly summery, but it was the best I could do under the circumstances. As a heads up, this month you can look forward to progress posts about the auction quilt, and maybe even some progress posts for Diva's big birthday spectacular that's coming up in April.
And now for my giveaway: To enter just check out another post on my blog then come back here and leave a comment. Old and new followers get an extra entry, just check it off in the Rafflecopter.
McCall's Pattern M5838 in size CCE (3-4-5-6)
Good luck! And thank's for stopping by!
Wednesday, March 6, 2013
Making Progress
Ok. So, I am currently in the process of collecting all the blocks for the school's auction quilt. As they come in, I am starting to press them out and square them up, and at the same time I have begun the task of cutting up the strips for the sashing. I'm running a tight ship here, so multi-tasking is a must!
Now, it has come to my attention that I have yet to reveal the mock up of the quilt. So sorry! Here it is in all of its glory!

Now, it has come to my attention that I have yet to reveal the mock up of the quilt. So sorry! Here it is in all of its glory!

I ended up not finding the Moda Marbles Deep Olive for the sashing, as I had planned. So instead I decided to go with Moda Marbles Summer Green. It is a little bit brighter than depicted in the image above; my only concern though, is that I still haven't seen it against the "girl on the fence" block that is located towards the center. I think there is enough variation in the color that it will be ok. I'm crossing my fingers though... just in case. Then I'm thinking I'll bind it with Moda Marbles in Burgundy... but I'll wait until I'm much further along before I decide.
Linking up with Freshly Pieced's WIP Wednesday.
Sunday, March 3, 2013
Almost to the Finish Line!

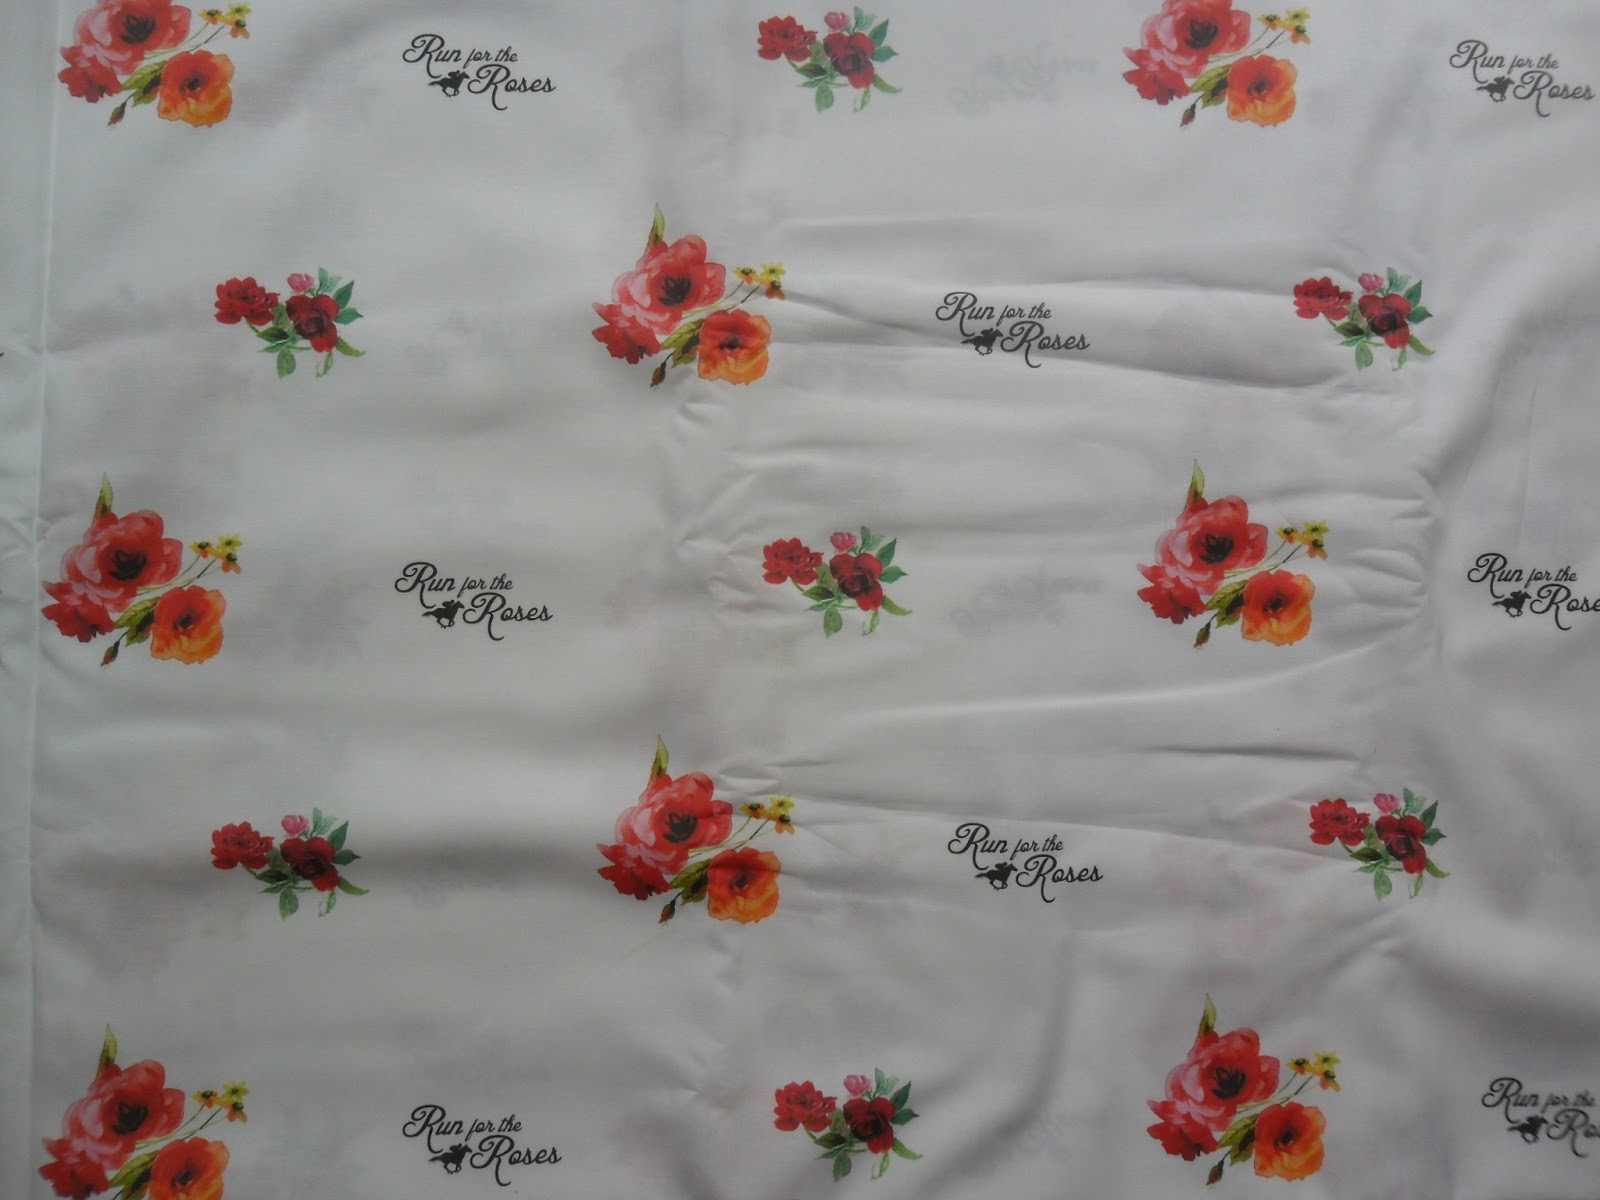
This past Friday I also received my custom fabric from Spoonflower. It turned out really nice, however part of me wishes I had listened to my instinct and made the flowers larger, instead of following the advice of my committee. They just would have made a bit more of a statement.
 Now the only thing I still need to get is the material for the boarders/ sashing. I've decided on using Moda Marbles in Deep Olive for that. It has just the right color variations to work nicely with all of the greens in the blocks... I hope! I'm heading back to the NJ quilt show today... alone... to pick up the fabric and maybe take a look around for some other hidden gems. Wish me luck!
Linking up with A Lovely Year of Finishes! and Let's Get Acquainted Monday's
Friday, March 1, 2013
Favorites from the NJ Quilt Expo and a WINNER!

Today I visited the New Jersey Quilt Expo and what a great day I had! I've decided to share some of my favorite quilts over the course of several posts, but this one called "Carousel Stampede" was one of my ABSOLUTE favorites! Cathy Wiggins from North Carolina won Best in Show (Mid-Atlantic Quilt Festival XXIV) for this masterpiece. She hand-painted the fabric on muslin (which took over 300 hours in and of itself!) and then quilted the entire piece (another 250 hours) and THEN spent another 40+ hours applying over 5,000 crystals! The piece is GORGEOUS!


And now for the winner of the Jungle Garden Animals fabric:
Congratulations Vicki T. (Be sure to check your email for further instructions!)
Subscribe to:
Posts (Atom)